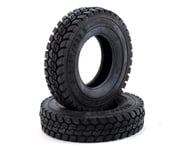
I bought these to mount on some Proline Hyrax tires, and use on a TRX-4 Sport. I wanted some steel beadlock wheels that I could add sticky wheel weights inside (these are not compatible with the weights) but thought $100-$120 was too much to spend on wheels. This is my second RC4WD product I've purchased (also a 2001 Taco Lexan body kit for crawler) and I have equal feelings for both products - which is woulda been 5 stars with better instructions.
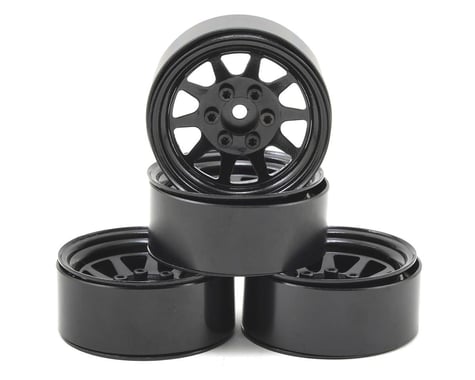
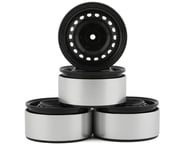
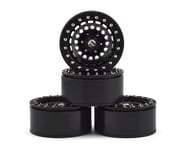
These wheels come in a plastic sleeve package, assembled, and with a very small bag containing 2 extra lug nuts. You can't tell by looking at the pictures or reading the description, but these are 4 piece wheels. I'm not sure of the actual names of each part, so for sake of this review I'll call them:
Barrel - outer most ring of the wheel
Wheel Face - the part of the wheel that you see when mounted on the vehicle
Back of wheel - matching part of the face that connects from the other side of the Barrel.
Rear Hub - this piece holds the Face and Back of wheel together, and also where the wheel connects to the axle.
After spending probably 2 hours or more attempting to mount the first wheel to the first tire (and watching 4 or 5 YouTube videos mounting RC4WD beadlocks), I came to the conclusion that RC4WD made a mistake by making these 4 pieces. The Back and the Rear Hub should be one piece. I'm not sure if they were made separately to save cost, perhaps the Back is a stamped piece of steel and the Hub is machined...but still, it would've served us customers greatly if they'd have welded the two pieces together, then drilled out and threaded the holes through both. On YouTube, I found people mounting similar style wheels to tires, and showing their tricks. One guy had the same style of 4 piece wheels for a mini crawler and suggested using clamps to hold the Face close enough to the Back so that the lug nuts will go through both and reach the Hub so they can begin the threads. But there's a couple problems of why this doesn't work for these wheels on these tires. After you install the Barrel, then place Back and Face on opposite sides of the Barrel, there is about a 0.5" gap between the Back and Face. The lug nuts are only 8mm long - which don't even clear the Back without some compression. The bolt pattern of the lugs, and the spoke design of the Face and Back, only line up one way - which you'll lose repeatedly. If you try using clamps to pinch together the edges of the Face and Back, you'll find that it easily displaces the bead of the tire - not permissible if you want to mount these correctly. After many attempts to maintain alignment of the Face and Back (remember, there's exactly one way these line up), and getting them pulled together tight enough so that the 8mm lug will not only reach through the rear, but extend far enough so that you can thread it in the Hub I determined that I needed a way to apply a force to clamp the Rear and Face together from the center axis of each. Had the Hub been connected to the Rear, you could have probably just used your hands for mounting these. But keeping same holes aligned in 3 parts, while feeding an 8mm lug through them, and then getting a thread started, while also paying close attention to the bead of the tires on both sides can get quite frustrating. The side of the Hub that is facing the axle, has a hexagon cut out that matches a part of the axle assembly on the truck. I considered going to a hardware store and looking for a bolt with a head that fit that hex, that was long enough to go through the whole barrel, and I'd use the TRX-4 bolt that holds the wheel onto the axle. But another problem presented itself with that...the center whole in the Face is bigger than the one on the Rear. In fact, its so big that to use a washer that's big enough to cover it, would block the lugs. That made me think that these wheels aren't even compatible with the TRX-4 is even if I figure out how to mount them - that bolt will go through the center hole on the Face. I later realized that this is OK, and the Rear will serve as the bolt stop for securing the wheel to the axle.
My father has few machining tools in his shop, so went over there to get a second set of eyes, tools and hands. We found a screw (not bolt) that would fit through both the Rear and Face that matched the threads on the TRX-4's wheel lug bolt. I put a phillips head bit in a vice, set the screw in place then used a washer that we grinded down into a square shape so that it would hold the Face, but not block the other lugs. This allowed us to squeeze the Face and Back together enough to start the lug threading into the Hub. Once we got two lugs threaded with an "acceptable" amount of bead sticking out, I put in the other lugs and slowly alternated tightening the lugs down in a star pattern - careful not to strip the lug nuts. It took about an hour for the two of us to get the first one mounted, and it still wasn't perfect. It was weird once it worked, because we had been trying the same thing over and over, and somehow it just finally all aligned and we got the first few threads turned. So we used that same method on wheel 2, but it still took 30mins or so until we had that lucky moment of perfect alignment. Then I realized I left the other 2 tires at home. I assumed that I'd just keep trying it once I got home and count on getting lucky again. We griped about the length of the lug nuts. If they had been a few millimeters longer, this would've been so much easier. When I got home to begin the task of mounting wheels 3 and 4, I noticed the 2 extra lug nuts included in the packaging were longer. Reading the spec sheet I see that they are 14mm. I used these two to on opposing sides of the bolt pattern and they held the Face, Rear and Hub together close enough so that I could mount 4 of the 6 8mm lugs. I then removed the 14mm lugs and replaced them with the 8mm lugs. IDK why this kit didn't include say 24 12mm lugs instead of 8mm. When the 8mm lugs are completely tightened down, you can see they are still several millimeters away from filling the Hubs. Perhaps 14mm would extend through the Hub and rub on the axle somewhere, but a 12mm lug would probably fit and make this kit much easier to assemble.
The bottom line is, had RC4WD taken the time to include some instructions, maybe a drawing, or even a simple note that says "the extra bolts are not spares - they're used to mount the wheels on tires and you NEED to use them" I could've mounted all 4 of these in maybe 30mins. Instead I spent probably close to 3 hours trying to figure out how to mount these.