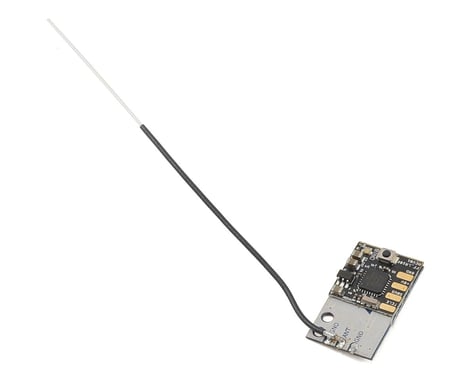
Furious FPV LR1000 Receiver (FrSky)
FPV-0151-S

This item is discontinued and no longer available for purchase. You may want to search our site for a similar item.
FREE U.S. Shipping on orders of $99 or more*. See complete details >
The Furious FPV LR1000 ultra micro receiver to provide pilots with unheard of features in an extremely small & lightweight package. The LR1000 offers up to one kilometer of range, S-Bus output without the need of an inverter, 8 channel output, & telemetry. Furious FPV has designed this to provide pilots with distinct features when looking for an FrSky compatible receiver.
Features:
Specifications:
Range: Up to 1Kilometer
Input Voltage Range: 3.5V-10V
Weight: 1.4g
Size: 23x14x4mm
Compatibility: FrSky Taranis, Taranis Plus, & XJT
Configuration
Following, there’s some useful info for the setup and use of your Furious Mini RX.
1. Binding the receiver to the Frsky Taranis
In the Taranis, go to MODE SETUP (page 2) in the model configuration.
Go to Mode inside Internal RF and select D8.
Press and hold the receiver bind button and plug your battery in to turn the receiver on.
Release the button. A green LED lights up in the receiver.
Going back to the Taranis; we press BIND. The transmitter beeps, indicating it’s in bind mode.
Wait for the green LED on the receiver to turn off. The binding procedure has finished.
Exit the BIND mode in the Taranis.
Unplug the battery to turn off the receiver.
2. Binding the receiver to the XJT module
Using the dip switches of the XJT module, select the D8 mode. They should be in the following position: switch 1 = ON, switch 2 = OFF.
Press and hold the receiver bind button and plug your battery in to turn the receiver on.
Release the button. A green LED lights up in the receiver.
Press and hold the bind button and turn the transmitter on.
Release the button. A green light should blink in the module, indicating it’s in bind mode.
Wait for the green LED on the receiver to turn off. The binding procedure has finished.
Turn the transmitter off.
Unplug the battery to turn off the receiver.
3. Receiver Configuration in the Cleanflight configurator
In the PORTS PORTS tab, select the UART that corresponds to the receiver (usually UART3 in F3 flight controllers) and activate Serial RX.
Save by clicking on the Save and Reboot button.
In the CONFIGURATION tab, in the Receiver Mode section, select RX_SERIAL.
In the same tab, in the Serial Receiver Provider section, select SBUS.
Save by clicking on the Save and Reboot button.
Go to CLI and type the following commands:
set sbus_inversion = OFF
save
The FC will reboot, applying the change.
Go to the RECEIVER tab and make sure the receiver acts like it should.
4. Telemetry Configuration:
In the PORTS tab, select the UART that corresponds to the telemetry (usually UART2 in F3 flight controllers) and select FrSky in Telemetry. Leave the baudrate to AUTO.
Go to CLI, and type the following commands:
set telemetry_inversion = ON
save
The FC will reboot, applying the change.
Make sure you’re getting the telemetry values in our Taranis correctly.
This product was added to our catalog on January 13, 2017